
For early-stage startups, customer support typically begins with a shared inbox. While that might work for a handful of requests, it quickly becomes unmanageable as your workload grows. Tickets get missed, responses become inconsistent, and customers lose trust.
Zendesk offers a lean, scalable customer service platform that can help you launch a fully functional help desk system in just seven days. By starting with the essentials, email forwarding, macros, a basic SLA, and a small knowledge base, you can handle requests professionally from day one without overcomplicating your setup.
This guide provides a day-by-day startup help desk launch plan to get your Zendesk instance live in a week, with best practices that set you up for sustainable growth.
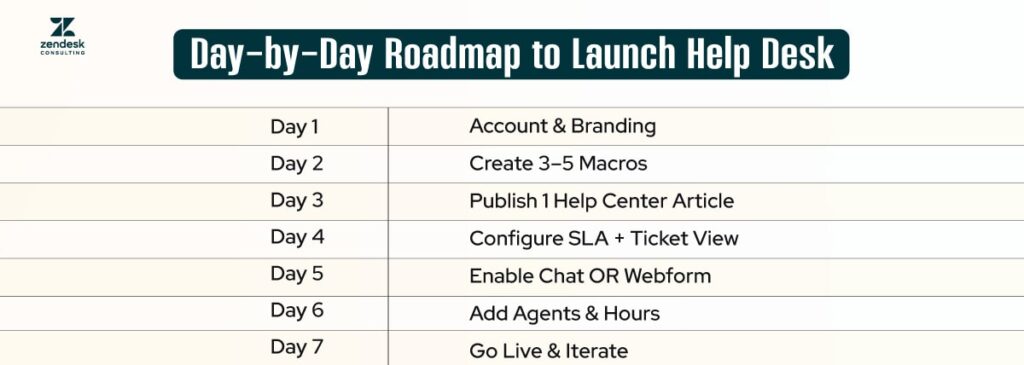
Day 1: Set Up Your Account, Email Forwarding, and Branding
The first step is to create your Zendesk account and connect your primary support email. Email forwarding ensures that any message sent to support@yourdomain.com is automatically converted into a ticket in Zendesk. This keeps everything centralized and trackable from the start.
Once email is set up, customize your Zendesk Help Center branding. Add your logo, choose colors that match your company’s identity, and customize the URL to something like help.yourdomain.com. A consistent brand experience helps build customer trust even before they receive their first reply.
Add an “About Our Support” article in your Help Center that outlines your support hours, channels, and expected response times. It sets expectations and reduces unnecessary follow-ups.
Day 2: Create 3–5 Macros for Common Issues
Macros are reusable responses that can insert pre-written text, update ticket fields, and assign tickets with a single click. They save your agents from typing the same answers repeatedly and help maintain a consistent tone.
Start with three to five macros that address your most common startup queries, such as:
- Account setup instructions
- Password reset guidance
- Shipping or delivery updates
- Refund policy details
- Product troubleshooting steps
In Zendesk, go to Workspaces > Macros > Add Macro. Give each macro a descriptive name, add your response text, and use placeholders (e.g., {{ticket.requester.first_name}}) for personalization.
Day 3: Build Your First Help Center Article
Your Help Center serves as your self-service knowledge base, enabling customers to find answers without needing to open a ticket. On day three, publish your first article. Choose the topic that comes up most often in customer conversations.
When writing, keep your content short, clear, and visually helpful. Use step-by-step formatting, add screenshots, and break up text with headings so it’s easy to scan. If the question has multiple solutions, include all of them.
Use keywords that your customers might search for, both in your Help Center and Google searches. This not only reduces the number of incoming tickets but also improves discoverability.
Day 4: Configure One SLA and a Ticket View
Service Level Agreements (SLAs) help you measure and meet response and resolution times. For your first SLA, keep it simple: consider a 24-hour first-response target for all email tickets and a shorter time frame for live channels, such as chat.
To configure, go to Admin Center > Objects and Rules > Business Rules > SLAs, set your targets, and assign them to relevant tickets.
Next, create a custom ticket view so your team can see tickets sorted by priority. For example, make a “High Priority” view that filters tickets tagged as VIP or close to SLA breach.
Use the “Order by SLA breach time” option so urgent tickets appear at the top.
Day 5: Enable Chat or a Webform if Needed
If your business model benefits from instant replies, such as e-commerce checkouts or SaaS onboarding, activate Zendesk Chat. Place the chat widget on strategic pages such as pricing, checkout, or product demos.
If real-time chat isn’t necessary, use the Zendesk web form to collect structured inquiries. Forms help capture all necessary details upfront, thereby reducing the need for back-and-forth communication with customers.
Start with just one additional channel to avoid spreading your team too thin.
Day 6: Assign Agents, Define Roles, and Set Hours
Now it’s time to invite your team into Zendesk. Assign them agent roles; for example, admins can manage settings, while light agents can only comment internally.
Define business hours in Admin Center > Schedules. These hours are essential for accurate SLA tracking and for setting up automated “out of office” messages during off-hours.
Ensure each agent understands their responsibilities, including who handles escalations, who manages chat versus email, and who updates the knowledge base.
Day 7: Go Live, Monitor Tickets, and Iterate Weekly
Launch your help desk and start taking tickets. Keep a close eye on key metrics, such as First Reply Time, Ticket Volume, and Customer Satisfaction. Review open tickets daily and discuss any recurring issues in your weekly team meeting.
Every week, refine your setup. Add new macros for emerging FAQs, publish help center articles based on frequently asked questions, and adjust SLAs as your team’s capacity expands. The best help desks are iterative; they evolve as your business and customer needs change.
Scale Your Startup Help Desk Beyond Week One
Once your basic help desk is live, you can start scaling intelligently:
- Add multiple SLAs for different ticket priorities.
- Use triggers to automatically assign tickets based on tags, channel, or content.
- Integrate your CRM so that agents can view a customer’s purchase history and notes alongside their tickets.
- Expand your knowledge base into multiple categories with articles, videos, and step-by-step guides.
- Enable Zendesk Messaging for persistent, cross-platform conversations.
Keep measuring performance with Zendesk Explore. Monitor trends in ticket volume, channel usage, and resolution times to determine where to allocate your next investment.
Conclusion
Launching your first Zendesk help desk in seven days is possible when you focus on essentials first. Start with a clean, branded workspace, a few key macros, a single SLA, and a knowledge base article. From there, add only what is necessary, based on actual ticket data.
A lean, focused Zendesk setup allows startups to deliver fast, consistent, and professional customer support without overwhelming the team. As your business grows, you can scale Zendesk into a complete omnichannel customer service platform; however, your week-one foundation will ensure that every future improvement builds on solid ground.
FAQs
How many agents should a startup have in Zendesk?
Start with the minimum you need to cover your active hours. Many early-stage startups manage with one to three agents before scaling.
Is Zendesk overkill for small startups?
Not if you start lean. By using only essential features at first, you avoid complexity and have room to grow.
When should I add live chat?
Add it when your sales or support process benefits from instant replies—such as preventing cart abandonment or closing SaaS leads faster.
Can Zendesk integrate with my CRM?
Yes. Zendesk integrates with platforms like HubSpot, Salesforce, and Pipedrive to provide agents with a comprehensive view of customer context.
How often should I update my Help Center?
At least monthly, or whenever new FAQs emerge from your ticket data.
